Configuring AutoArchive
The following guide will walk you through configuring Outlook's AutoArchive feature. Once enabled, email messages older than six months will be moved onto a new PST file located under Documents\Outlook.
To learn more about the AutoArchive feature, please see Microsoft's Support Page.
Configuring AutoArchive
Within Outlook, please select File >> Options within the left-hand column.
Select Advanced within the left-hand column.
Select AutoArchive Settings...
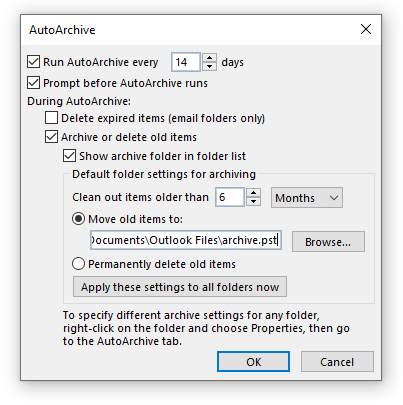
Select Run AutoArchive every and ensure the following settings are configured:
A screenshot has been provided below to assist with ensuring the correct settings are configured.
| Field | Value |
| Run AutoArchive every | 14 Days |
| Prompt before AutoArchive runs | Checked |
|
During AutoArchive: |
|
|
- Delete expired items (email folders only) |
Unchecked |
|
- Archive or delete old items |
Checked |
|
- Show archive folder in folder list |
Checked |
|
- Clean out items older than |
6 Months |
|
- Move old items to: |
[Documents]\Outlook Files\archive.pst |
Please create the "Outlook Files" folder if it does not exist in your Documents folder.
Below is an example of the correct settings:
With the settings configured, press Apply these settings to all folders now to enforce AutoArchive against your mailbox. Press OK once finished.
Exclusions & Modifications
Excluding Folders
By default, all folders within your mailbox will have the AutoArchive settings applied. This includes your calendar. If you'd like specific folders to be excluded from the AutoArchive process, please follow the steps below:
- Find the folder you wish to exclude, right-click and select Properties.
- Select the AutoArchive tab.
- Select the Do not archive items in this folder radial.
- Press OK to apply the changes.
- Repeat the above steps for all folders you do not wish to AutoArchive.
Some folders you may wish to exclude:
- Calendar
- Deleted Items
- Drafts
Customizing Retention Times for Specific Folders
By default, Auto Archive will migrate all emails older than six months into your Archives PST. For certain folders, such as folders containing current client emails, this may not be desirable. To lengthen or shorten specific folders, please:
All emails older than 13 months must be archived. Please do not update Auto Archive to allow messages to remain in your mailbox that are older than 13 months.
- Right-click on the folder you wish to modify the AutoArchive policy on and select Properties.
- Select the AutoArchive tab.
- Select the Archive this folder using these settings: radial.
- Change Clean out items older than to you're preferred length of time (between 6 and 13 months).
- Ensure Move old items to default archive folder is still selected.
- Select Apply then Ok.
Performing the First Run
Prior to starting the AutoArchive process for the first time, please note:
Please read to avoid data loss.
- If possible, its best to run the AutoArchive process while located in the office on a hardwired connection. Completing the AutoArchive process via VPN can be done, however performance may suffer.
- Depending on how much email data requires archiving, the first initial run may take a few hours if not longer to complete. Please perform the initial AutoArchive run first thing in the morning.
- Please do not shutdown or restart Outlook while AutoArchive is running. Doing so can cause corruption.
- Outlook may run slower than usual while the AutoArchive process completes.
To manually start the first run of AutoArchive, please:
- Within Outlook, please select File >> Info.
- Select Tools >> Mailbox Cleanup...
- Select AutoArchive.